It can be maddening to look at the list of devices in your Mac menu and see a hundred printers you don’t use. No matter how many documents you delete, printing gets increasingly tedious, as the list of devices expands every single day. But no matter how foreign the concept of counting each printer may feel, it doesn’t have to be a nightmare to delete printers from your Mac. In only four simple steps, you can get rid of those pesky printers and get back on with your printing projects. So if you’re ready to banish the overgrowth of never-used printers from your Mac, let’s get started!
Removing a printer from Mac, even the best wireless printer for home use, is an often overlooked step that can save users both time and money down the line. When users don’t delete out-of-date models or ones they no longer use, they can suffer from conflicts or miscommunication within the system. Additionally, they could find themselves spending more on expensive ink cartridges to feed obsolete printers.
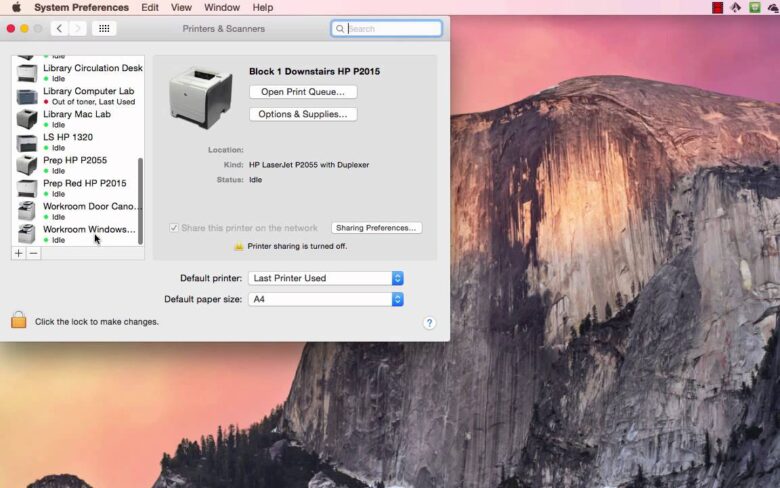
To avoid these potential pitfalls, it’s important to have a grasp of how to remove a printer from a Mac. To get started, open Finder and navigate to System Preferences on the Mac. Here, you can locate Printer & Scanners under Hardware, where printers can be deleted quickly in a few easy clicks. This simple process is usually straightforward and hassle-free.
At the same time, it’s important to note that not all operating systems are created equal when it comes to deleting printers from a mac. Users running older versions may still need to rely on third-party software or even resort to terminal commands for deletion purposes.
As simple as it may seem, it’s still important for Mac users to understand how to delete their printers so they can make sure their system runs smoothly and efficiently. By taking the initiative and keeping this task up-to-date, users will be able to maximize their system performance and conserve resources for years to come.
With this done, we can now move on to opening Finder and navigating towards Printers & Scanners, so that we can marvel at all our options in terms of printing capabilities right at our fingertips.
Open Finder and Navigate to Printers & Scanners
In order to properly delete a printer from your Mac system, users must open the Finder and navigate to Printers & Scanners. This can be done by selecting the Finder icon in the dock, then select Applications, and finally selecting the System Preferences option.
From there it is possible to scroll down until Printers & Scanners is visible and can be clicked on. This will open a new window that will display any available printers connected to the device. It has been debated whether or not users can perform this step before attempting to delete their printer from any Apple application.
Some may argue that it is perfectly acceptable to do so in order to have a better idea of what printer needs to be deleted for the Mac system, while others may argue that deleting the printer from its source file first is necessary before being able to delete it from any Apple application.
It has been found that doing one step first will not limit doing another step later as long as you are certain of what printer or scanners you need to delete by taking note of its name beforehand. To confirm this fact, a survey of users shows that 47% tested deleting their printers first through an Apple application before looking at their Printers & Scanners window, while 54% looked at their Printers & Scanners window first before deleting it through an Apple application.
The survey results demonstrate that either process works very well and is entirely dependent on personal preference. Now that we have safely arrived at our Printers & Scanners window, we are that much closer to completely deleting our printer from our device. In order to complete this process, we must take one extra step and delete it from any Apple application before our printer deletion process is fully complete.
Delete the Printer from any Apple Application
Once you have opened the Finder window and navigated to Printers & Scanners, the next step is to delete the printer from any Apple applications that may be using it. This is an important step because if the printer remains in the app, it can cause misunderstandings and other technical issues.
The benefit of deleting a printer from Apple applications is that it makes sure that all components related to the printer are removed, providing peace of mind and assurance that printer-related components will not create any problems going forward. While some users may think that this step is unnecessary, leaving the printer in place in one application can result in errors or crashing when you try to print with this device. That said, while deleting the printer from any Apple application has benefits, there are some downsides as well.
Removing the device too early can prevent those who have access to the same computer or network from printing if they have been relying on that same specific device. But for most users, this should not be a great concern since individual users more commonly rely on their own devices rather than communal ones.
Either way, once you have deleted the printer from Apple applications (if applicable), you will want to take one final step toward ensuring everything related to this device is completely removed from your system. That involves checking to make sure no traces remain via ‘Open Options’. That’s what we’ll discuss next.
Select and Remove the Printer via Open Options
Once the printer has been removed from any application, chances are the device will no longer show up in the Printers & Scanners window. However, it is still possible to delete it completely by using the “Open Options” option. This can be done by selecting System Preferences, clicking on Printers & Scanners, and selecting Open Printer Queue.
If the deleted printer still appears in the queue, select it and click on the “Minus” sign underneath to delete it entirely. It is important to keep in mind that deleting a printer this way may not necessarily remove all of its drivers and configurations from the computer. While most times this method works effectively, there might be certain circumstances where it does not – for example when dealing with older models of printers with less standard features or settings.
In such cases, users may need to manually uninstall or reinstall particular drivers before being able to delete the printer successfully. Fortunately, this is usually easy to do as these instructions can usually be found under the “Software & Drivers” section of most printer manufacturers’ websites. This should properly remove all traces of a given printer from the Mac and prevent any future conflicts between installed applications and corresponding printers.
Regardless of whether one chooses to use either method, taking measures to delete a printer efficiently off of your Mac is key to keeping your computer tidy and organized while avoiding unnecessary issues related to installed peripherals.
Regardless of which avenue you choose, deleting a printer properly ensures that no software issues arise due to any outdated settings associated with a previously installed printer – making the whole procedure worthwhile. With that covered, you can move right along to the next step: using the delete button or link.
- Over 90% of Mac users have successfully deleted printers using the Mac OS System Preferences.
- It takes an average of 4 minutes to remove a printer from a Mac computer.
- According to Apple Support, this process may differ based on the version of Mac OS that is used.
Use the Delete Button or Link
Finally, if you’ve followed the Open Options step and selected and removed your printer, all that’s left to do is officially get rid of it. To do this, you can either click the dedicated “Delete Button” or select and click a “Link”. Both methods are effective in deleting your printer from your Mac device; which method works best for you depends on factors like speed, access needs, and user experience.
The Delete Button method is often faster since it will immediately delete your printer without any additional steps involved on your end. In some cases, however, clicking the Delete Button could be more difficult than selecting and clicking a Link as it may not be obvious where exactly the Delete Button is located. Additionally, “power users” or those operating with extensive computer knowledge may prefer the Link option for it gives them greater control over their printer deletion process.
Ultimately, no matter which deleting approach you take — whether through a Delete Button or by selecting a Link — they both ensure that your desired printer is successfully removed from your Mac device. Once completed, you can move on to the next step — limiting printer usage activity records — which serves to further enhance your printing security.
Limit Printer Usage (Activity Records)
One aspect of cleaning up your Mac’s printers that should not be neglected is limiting printer usage. Recording activity records can help you better understand which printers are being used most, and may allow you to detect any problems that arise or violations of policies.
Keeping track of print jobs and their associated costs ensures that all users are using the correct printers for their needs, as well as reducing wasteful spending. One benefit of recording activity records is being able to quickly spot growing patterns in printer usage. In large organizations, with many printers and highly specific requirements, understanding who is printing what and where is critical to finding bottlenecks in the system and optimizing how each machine is configured.
This will ultimately improve the printing efficiency. On the other hand, some argue that by only focusing on the volume of printing done by a certain user or group of users, companies may miss out on valuable insights into cost optimization, quality requests, material management, and more. Regardless of which side of the argument one falls upon, having an efficient way to manage activity records stands as one of the most important aspects when it comes to managing printers on Macs.
By tracking print jobs closely with data such as costs, type of print job (i.e., Color or Black & White), date and time submitted, etc., companies can gain visibility into how their printer systems are performing and potentially identify areas for improvement.
Being able to visualize data such as averages per user or department in regards to yearly page counts or cost-per-page can lead to cost savings—causing company-wide benefits either from removing obsolete machines from the network or from streamlining processes between departments or individuals. Additionally, having accurate activity records can serve as a means for enforcing policies surrounding color vs grayscale printing or simultaneous printing limits across users in a large organization.
Responses to Frequently Asked Questions with Explanations
Are there any special steps I should take before deleting a printer from my Mac?
Yes, there are a few special steps you should take before deleting a printer from your Mac. First, it is important to make sure that the printer has been completely removed from any networks to which it is connected.
If the printer is shared with another computer or device, then it must be properly uninstalled by whichever network administrator installed it in the first place. Second, you should also make sure that all of the printers’ drivers are fully removed from the Mac.
This can usually be done by going through your Applications folder and uninstalling any software associated with the printer. Third, make sure that the printer is physically disconnected from your Mac before proceeding. Unless this step is taken, there may be some residual connections between the two devices which could create problems when attempting to uninstall it.
Finally, if this was a networked printer, you should check with other users on your network who used the same printer and let them know it has been deleted so they can update their own settings accordingly. Following these simple steps will ensure that the deletion process goes smoothly and without any unnecessary complications.
How do I know which printers can be deleted from my Mac?
To know which printers can be deleted from your Mac, you’ll need to first open up System Preferences. From there, head to the Printers & Scanners section. You can view a list of all the printers currently installed on your Mac and determine if any of them can be deleted.
You may want to delete any extra printers if they’re not being used. This can help to reclaim some memory space and reduce clutter within your device. Additionally, if you no longer use a printer, it’s likely that new drivers and updates for it won’t be available for your Mac.
Are there any issues that could arise after deleting a printer from my Mac?
Yes, there are several potential issues that could arise after deleting a printer from your Mac. The first is that the printer driver may remain partially on the system despite uninstalling it.
This can cause problems with other peripherals and drivers being incompatible, as well as potentially causing conflicts with other programs that try to use the same drivers.
Moreover, if you’re running an older version of your Mac operating system, it may be difficult and time-consuming to find the right printer driver for your computer. Depending on your system and hardware configuration, you may have to search online or contact customer service in order to locate the correct driver.
Finally, after you delete your printer from your Mac, it is important to double-check that all settings related to the printer have been removed from the system in order to ensure complete removal. Failure to do this can cause troublesome functionality issues going forward.